...it struck me that a bunch of these would make a super cute centerpiece for Thanksgiving dinner and fun little take-home gifts for anyone who might want one. So, of course, I had to share my moment of inspiration here in my weekly Year of Projects post. And since so many liked my button pumpkin stems on Wednesday, I thought I'd show step-by-step how to do it.
Using this pattern, a miniature pumpkin takes me just under an hour to make. And the button stem took just a few minutes once I pulled all the materials together (wire, wire cutters, needle nose pliers, and a bunch of old buttons that I had previously cleaned and sorted by color).
Select enough buttons to make a stem as long as you want it. You'll want graduated sizes, and I like to use a variety of complimentary colors and materials (I used wood, plastic and even metal buttons). Once you've picked out your buttons, stack them from largest to smallest.
As you stack them, they'll flop over on top of your pumpkin, but having them in order is important before you begin stringing them onto the wire.
Cut your wire about twice as long as you think you'll need:
I used 20 gauge wire. You might be able to use thicker wire, but I don't think thinner wire will work. You need a wire that is thin enough to thread onto the buttons, but thick (and strong) enough to allow you to push it through the pumpkin. I found 20 gauge wire flexible, but with just enough body for this purpose. And 20 gauge is what I had on hand. I almost always try what I have on hand before buying something else.
"Fold" the wire in half (make this a soft fold, or a curve - as opposed to a sharp fold). Trim one side of the wire shorter (it took me several fiddly attempts before this little idea occurred to me. Do it. It will make it easier to thread buttons onto the wire):
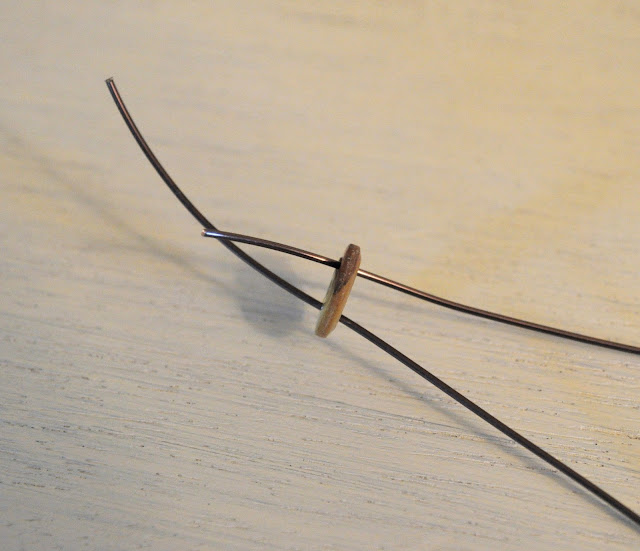
Starting with the smallest button, thread it onto the longest wire end first, then pull the button down, slipping it onto the shorter end of the wire (through the opposite button hole), all the way to the "fold" of the wire. Pull the wire tight:
Don't try to thread more than one button at a time. If you thread more than one at a time, you won't be able to see the button holes and you'll likely thread the buttons on crooked. You always want to thread the buttons onto the wire through opposite button holes (this is important to pay attention to if your buttons have 4 holes). Your stack of buttons should look like this:
To make pushing the wire through the pumpkin easier, cut both ends of the wire on the diagonal, making a point:
Decide which side of the pumpkin you want to be the top and push both ends of the wire into the center of the top all the way through the bottom.
The wire ends will not likely come through the same place on the bottom. Not to worry. While you want them to be close to the center (and close together), it's fine (maybe better) if they don't both come through the center hole.
From the bottom, pull tight and twist the wires together by hand (this doesn't have to be perfect - just tighten and twist the wires together as best as you can by hand, making sure the buttons are snugged together on the other side of the pumpkin). You'll want an inch or so of twist. Trim the excess wire off.
Now, with a needle-nose plier twist the hand-twisted wire into a small circle and push the sharp edges of the wire up into the pumpkin:
And that's it! Do this over and over again, with a variety of yarns and buttons, and soon you'll have a heap of pumpkins!
Just a few more and I'll be ready for Thanksgiving!
To see what other Yoppers are up to this week, visit our thread on Ravelry.


Love the little pumpkin button stems and they really finish off those cute little pumpkins. Thank you for the tutorial.
ReplyDeleteThank you, Ruth.
DeleteOh they are gorgeous, great tutorial!
ReplyDeleteThanks, Lucy. :^)
DeleteThank you SO much! Those are so much cuter than the crocheted stems. They are the cutest I've seen so far. May I ask what pattern you used for your pumpkins? I'll check back on your previous posts as maybe you mentioned it before. What a great tutorial.....you must know me! LOL!
ReplyDeleteThe pumpkin pattern is linked to in the post. And thank you for the affirmation regarding the tutorial. At first I wondered if it's too simple of a thing to actually make a full tutorial on, but I know I fiddled around with the first button stems I made and thought maybe I could help it be a simpler (and quicker) job for someone else who wants to try it. I did not come up with this idea, btw. Another gal (who no longer has an active blog - I don't think) did this a few years ago and I fell in love with the idea. I'm so glad others like it too.
DeleteThank you so much for sharing! These pumpkins are super cute!
ReplyDeleteThanks, Alina. :^)
DeleteYour button stems are so clever! I'm imaging all sorts of great things to do with buttons now.
ReplyDelete:^)
DeleteThat is such an adorable idea!!
ReplyDeleteAli @ SimplySummerStreet
Thanks, Ali.
DeleteOh my goodness, that pumpkin is just the cutest!! I really want to make some as mantlepiece decorations for the lounge...
ReplyDeleteWell, these are quick and easy, Iris! You could have a mantle full before you know it. :^)
DeleteVery creative idea! And, so cute :)
ReplyDeleteThank you, Jamie.
DeleteOh thanks for the tutorial! I love them!
ReplyDeletethank you for sharing this!
ReplyDelete