Sunday, February 20, 2022

Sauteed Shredded Brussels Sprouts...

Back in the kitchen for another New Thing this week.    

Ever since Christmas day when I enjoyed a restaurant meal of sautéed shredded Brussels sprouts alongside broiled salmon, I knew I wanted to make this side dish at home.  I also decided I was going to (try to) learn to cook a salmon filet to perfection - but that's for another day.

On the lookout for fresh Brussels sprouts I've been surprised and dismayed at how expensive they are (or have become maybe?).   But I kept an eye out, and finally, on my last shopping trip, I found some fresh Brussels sprouts that were in the range of affordable (1.99/lb, I think), so I brought home two mesh bags of them.   Two bags was probably one too many, but, well...  live and learn.

This post is going to now turn into a recipe of sorts, for future reference if I ever forget how to make sautéed Brussels sprouts - which seems ridiculous because of how easy these are to prepare this way,  but you never know...  This dish does not need a recipe, and that's why you'll not find measurements here, but if you're comfortable in the kitchen you'll totally get that this isn't an exact science, but rather you prepare this dish by sight, feel and taste.  If you've tired of roasted Brussels sprouts, or just downright hate them (for whatever reason), you might want to consider this way of cooking them before completely giving up on them. They are very healthy, I understand.

So anyway... once home, seeing that the outer layers of most of the sprouts were scarred and a tad discolored in places, I got out my paring knife and peeled off the first layer or two.   And cut off the bottom most part of the base.  I didn't clean them otherwise.

Then with a larger slicing knife I sliced them into pretty shreds.  Pretty simple, too.  Some people use a mandoline slicer, I understand.  Or maybe a box shredder.  But slicing them with a sharp knife worked fine for me.

When shredding Brussels sprouts, a little goes a long way I found out.  For two of us, I probably sliced up 6 to 8 sprouts.

Then I heated up some olive oil in a frying pan.  Added some butter, then tossed in the shredded Brussels sprouts and stirred and heated until they started to wilt a bit.


Now's about when I added some sea salt and some freshly ground pepper.  And continued sautéing them, continuing to toss and turn the shredded sprouts over and over in the pan until they started to caramelize.  Tongs are perfect for this.  At some point in the cooking (I'm thinking at the beginning of things starting to brown,) if you have any cooked bacon hanging around, you can add it to the pan if that sounds good to you. 

But bacon isn't necessary.  And I didn't have any cooked up, so I just kept going, adding a bit more butter as it seemed a good idea to do so - my goal was to have something of a buttery sauce as I completed cooking this dish.  

Keep stirring and sautéing, 'till it all looks done!  Like this:

The texture is softened, but with some crispiness left to it.  Really, I think you can just cook this as long as you want, but this took me mere minutes.  Less than 10, I'm pretty sure.

Many recipes will have you add balsamic vinegar, so I did (right after I snapped the above picture), and as soon as I tasted them, I instantly regretted it.  Maybe I was using a cheap, bad-tasting balsamic (very possibly), or maybe I used too much (though I don't think so), but I will forego it in the future.  These went from tasting fresh and having their flavor heightened by caramelization, to turning overall brownish and having their fresh taste overcome by the vinegar.  We ate them, and I finished them off, but I'm of the opinion that balsamic vinegar (aside from being an acquired taste), really didn't improve the dish.  If you like balsamic, though, knock yourself out.  Edited to add:  I've made this dish several times again since posting this, leaving out the balsamic vinegar and I, personally, think they taste much better without it.

And that's really it!   If you make this dish and add any kind of acid besides balsamic vinegar, I'd be happy to know it.   I may play with some other things like lemon juice, or a white wine vinegar, but otherwise, some butter, salt and pepper makes these sautéed sprouts very good.

I'm planning on thawing out some salmon I've got in the big freezer, and fixing some more of these shredded sprouts later in the week.  :)  We'll see if I can get the salmon-cooking-thing down now.

That's nine new things in 2022!

After being annoyed at the blogger editor telling me I was misspelling Brussels sprouts (which I was spelling brussel sprouts), I finally looked it up.  I didn't realize that there was an s on the end of brussel.  Did you?  Makes sense, even if it's awkward to pronounce - for someone who never realized there was an s at the end.  


Thursday, February 17, 2022

Thursday night...

A strange, and yet somehow normal day in mid February in Indiana.  Mid 50's and rainy this afternoon, currently 32 degrees and snowing at 10:30.

Supper leftovers are put way, dishes are done, the kitchen is clean.  Here I sit folding clean towels. 

Gothic Noir filter on Samsung Galaxy J7 Sky Pro 


I believe I've mentioned elsewhere here how much I like kitchen towels...


Saturday, February 12, 2022

One New Thing...

I actually have two new things to report this week.

New Thing One:

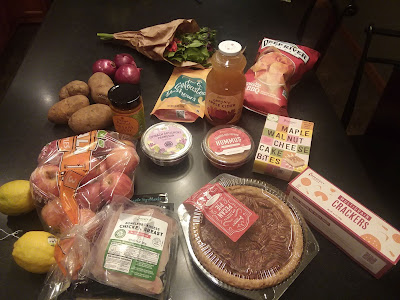
At Christmas Middle Son gifted us a box of goodies he curated from Imperfect Foods.   It came the week after Christmas, with meats in an insulated bag with a cold pack:


Unpacked, this was what the box contained:


There were several new-to-us things in the box, but the most delicious were 2 filet mignon steaks (from grass fed cows) - they must have been swept into the fridge before the above picture was snapped.   Mmmmm...  They were melt-in-your-mouth delicious, and I think it might have been the first time we've eaten that tender of a cut of beef.  It was definitely our first taste of grass-fed beef.

With the gift came an offer from Imperfect Foods of $20.00 off the first four orders we placed (if we should decide to do so).  We decided to give it a whirl, and we received our third order this past week.   I've ordered some new-to-me things each time, but this week the most interesting new thing I ordered was a dragonfruit:


I let it sit for a couple of days, 'till I was pretty confident the insides were the right amount of softness (based on the squeeze & press test).  I've read online that these fruits do not ripen after picking, so they are picked as close to ultimate ripeness as possible.  And some people say the fruit grows sweeter after it's picked and sits for several days. Not knowing who was right (or if both are technically right), figuring this fruit might have been close to a week old by the time I made the decision to cut into it, I was reluctant to put off eating it too long for fear that it might go bad.  

So...  Thursday, with much anticipation, I cut it open


and we had a taste.  

I don't think the color of the plate above enhances this fruit at all, but aside from that, we remained intrigued to try this.

The verdict?

For how exciting this fruit looks on the outside, the taste was pretty underwhelming.  I've read descriptions of this type of dragon fruit tasting between a watermelon and a kiwi.  Or a pear and a kiwi.  I'd have to say something much less than a pear or kiwi, but ever so mildly like those two things comes closest to what this one tasted like.

It was kind of disappointing, and maybe we ate a slightly underripe dragonfruit, but with these being pretty pricey, I'm thinking this will be our last (and lasting) impression of this very impressive looking, but underwhelming tasting fruit.


~~~~~

New Thing Two: 

This may particularly interest my fellow Blogger bloggers.  I think it was last summer, that we all lost our follow-by-email widgets from our blogs.   While I was disappointed this happened, with all that was going on in my world I didn't have the mental bandwidth to care too much about it.  That is, until one of my sisters discovered I had a blog and asked last week if there was a way to follow my blog by email.  Suddenly, I was motivated to do the thing I hadn't been motivated to do for months.

I did a little searching and found a free web feed subscription service in follow.it  and put a widget at the top of my sidebar.  I may move it down at some point, but I wanted to make it easy for anyone reading today to find it if interested.

I'm sharing this with you because 1)  it is a new thing, and 2) if you had been previously following my blog by email (through the original widget that was provided by Feedburner), you may receive (or may have received) an e-mail from follow.it offering you the opportunity to follow my blog through them.   If you are already receiving my blog posts through email, you may not want to do anything different.  I'm pretty sure I wouldn't.  I just want to let you know you may receive an email from follow.it and to let you know why. 

And if you want to start following my blog by email, it is as simple as plugging your email into the widget and hitting subscribe. Another way to subscribe to my blog through follow.it is to create a follow.it account, find my blog in their database, and follow me that way.

You may be wondering why you'd go to that trouble.  To be honest, I wouldn't, but you may care about these things:

  • If you subscribe using the widget, while I don't see anyone's name, I am made privy to your email address.  I promise you, I will never make use of your email address, unless you are a regular commenter and I think you might welcome a private email from me.  But seriously, I would imagine that situation would be rare, if it ever did happen.  I also don't plan to keep serious track of who may be following me.  Or who may chose to unfollow me.  It's just not something I'm into. 

  • If you create a follow.it account, and find me in their database and subscribe that way, your email address is kept private from me.   The other advantage you would have in creating a free follow.it account is that you can subscribe to various other news feeds, blogs, and I honestly don't know what all...  and keep track of your subscriptions there.

That's as much as I know at this point.  If you chose to use the widget to follow me by email, I'd love to hear any feedback you might have about the experience.  I doubt I can control anything, but knowing if readers are happy or not with it, will certainly help me know if it's a good service.  I subscribed to my own blog, and found it simple to do, and it works well for me.  But if you have a different experience, please let me know.

And that's all for this week!  

I think that's 10 new things in 2022!

Sunday, February 6, 2022

Kitchen organization...

Another one of my favorite rooms in the new house is the kitchen.  Even so,  it has taken some time to develop true comfortableness in.  Moving smoothly while cooking in a kitchen is something of a dance, as one moves from fridge, to counter, to oven, to sink, and any combination of back and forth between these spaces while preparing a meal.  Remembering where I placed specific dishes and utensils was a trick in the beginning, but once I figured out the right spot to store things and began to remember where things were, it was just a matter of time before movement in there started to become second nature.  

Having a different configuration of drawers and cabinets required me to come up with different ways of organizing and storing stuff.  The first thing for me to figure out were two corner "lazy-susan" type cabinets.  The first house that we bought (in 1987) had one of these cabinets and I remember storing food items in there, but having a nice sized pantry, I didn't need to use the space for that.  So I googled for ideas and came up with this:


I don't know that I would have ever come up with the idea of storing pots and pans, and other cooking equipment in these spaces, but as I'm using them this way, it feels like a perfect solution to these somewhat awkward storage spaces.  Handles of pots and pans can be tucked inside toward the middle, and everything can be stored with its lid on.  That may just be my favorite part - that I don't have to grab a lid from another location.

Then it was time to figure out some drawer storage issues.  

In our last house, we had a plastic Rubbermaid double-decker silverware divider.  We'd had it so long it was vintage - like us.  It worked well enough in the drawer we had always used it in, but it really didn't fit the drawers here very well, so I starting looking for something that would suit the space better.  After studying options online, I finally decided to give one of these bamboo adjustable drawer dividers a try.  I made a Christmas gift to myself of it, and I'm pretty happy with it.


It does slide backwards, since the drawer is about 4 inches deeper than this divider, but it's easy enough to pull it forward when I open the drawer.  I like this so much better than my double-decker silverware holder that never quite fit everything I wanted to put in the drawer.

Then I decided to rethink how I store knives.  We've always had a counter top knife block, and a wall mounted one, but both of the ones I owned had seen much better days (one was as old as our marriage).  Trying to eliminate what I can from the counter tops, I set out to find good drawer storage options for knives.   After studying different products online, I decided to go with a bamboo knife drawer "block", and I love it!

There's also room in the drawer to store other knife-y stuff beside it.    I actually have a second (smaller) drawer knife block nearer the microwave.  It holds the knives that were previously held in the wall knife holder. Does a couple need so many knives?   I'm sure not, but I've grown used to having a variety, and having them in different spots in the kitchen I can tell you... it's very handy to have options if you do a lot of cooking.

Next, I decided to tackle the toughest spot of all.  The utensil drawer.  Ugh.  This one I got a before picture of.  Anyone else have a utensil drawer that looks like this?


Honestly, before all the decluttering last year, this drawer (in our old house) looked much worse. Why it took moving for me to do something different, I'll never know.  

Online options were harder to figure out on this one, so I just kept putting off making any decisions.  And then before Christmas I was in Home Goods, and I found this Joseph Joseph drawer organizer:

I was intrigued by the many pieces, and imagining I could use any left over sections in other spaces, I ended up buying two sets - with the thought I could return these easily if they weren't what I wanted.

Well, it took me until sometime in January to pull it out and figure out how it works and how I wanted the utensil drawer divided.  I had no idea how the components fitted together, but look at this:

It's like some children's toys I've seen where pieces are made to fit together no matter what side you put up against another side.  Fantastic.  I will confess... this was the most expensive single purchase I made, but it was worth it.  Note:  I see it online for more than I paid  - which was 16.99 per set at Home Goods.  Now I like it even more!

I finally figured out what pieces would work with what I wanted to keep in this drawer, and this is what I came up with:
On my goodness!  It's almost hurts my heart thinking of how many years I shuffled through a messy kitchen drawer looking for the garlic press, or a wisk, or the kitchen shears, or those silly little flat plastic scrappers that always migrated to the back of the drawer.  All the time I spent getting exasperated...  No more!  I love this.   And I have pieces left over that will help organize some bathroom or office drawers eventually.

Full disclosure:  I also store several utensils in a holder on the counter for super easy reach:

But when all was said and done, I decided I so rarely (if ever) use these utensils, they can go:
Yay!  Decluttering too!


Okay, finally....

Another area that had me flummoxed was the bottom freezer of the refrigerator that came with the house.  I've never before had a bottom freezer and honestly... until I figured out a storage system, I was in serious dislike over mine. 

I went to the computer again to see what solutions others had come up with for storing food in what is basically a big box.  I wish I had thought to take a picture of what a mess my freezer was before I fixed it, but if you have one of these freezers, and you haven't yet tamed it, check this out:


Who knew the solution is the opposite of just throwing things on top of other things 'till the stuff on the bottom is so buried you can't possibly see what you have down there? 

I bought two taller-than-normal clear plastic bins (from Home Goods), and with the help of the sturdy white divider that came in the drawer I was able to create four separate spaces to store things.  I know it only looks like three different spaces, but let me explain what is pictured here.  From left to right, the first clear plastic bin holds meat, and slid down between the meat bin and the white divider is a slim package of naan bread, and another slim package of flat bread.  Bacon or any slim packages could also fit in this space.  Moving right, in the space between the white divider and the second clear plastic bin, I have packages of frozen fruits and nuts.  And in that last plastic bin on the right, I store packages of frozen vegetables.  

Except for the packages of fruit, I tried to fill the boxes with things stacked on their side or on end.  Marie Kondo would be proud, I think.  Doing this, means nothing has to be removed to get to something else.  Except the fruit.  For some reason my baggies of fruit didn't stand on end.  They are more floppy. 

There is also a shallow drawer above this space that holds the ice collection tray, and is where we keep coffee and several containers of ground grains, yeast, chia seeds... stuff like that.  Since all those things have stiff containers, and nothing can really get buried there, I don't have a need to divide up the space.

If you like this idea, I suggest that you look for the tallest bins that will fit in your freezer box.  To know what will fit, empty out the box, then measure the smallest part of the box - my freezer box tapers near the bottom, so I wanted to be sure to measure the bottom of the box, not the top, and buy a bin that would fit that measurement.  And of course, you can't use a bin that is taller than the box, so that measurement is important too.  Seriously, I'm making this sound this harder than it is.  Once you empty it out, just take all the right measurements and you're golden. 

Have fun if you do this.  Truly, this changed my relationship with my bottom freezer.  I almost prefer it over a top freezer now.  Actually, if I could keep ice from accidentally escaping when I scoop some into a glass, I would prefer it.  The ice situation is an irritant. If someone knows the solution to slippery rogue ice cubes, I'd love to hear it.

I'm counting all this kitchen organization (but mostly just my freezer) as one new thing added to my growing collection of new things in 2022 - for 8 new things!